


Okay, I now deployed some basic infrastructure (Domain Controller, Firewall & Cloud Connect), I will focus now on creating my templates within Prism, so I can speed up deployment a bit.
WARNING
This post is quite basic and I found the actions very tedious, but nevertheless I found it necessary to put it out here as it’s part of creating The LAB
First I need to upload my required ISOs to the image containers within Prism Central. I logon to the PC console and go to Virtual Infrastructure – Images

Here I choose Add Image to upload my ISOs

I add a file from my local computer, give it a sensible name and description and click Next.

Next up the placement method. Normally (in any production environment) I choose Use categories, but as I have only a LAB environment and want to keep some things simple, I opt for the second option in this case and click Save.

I will repeat the above 3 times so I have my major ISOs available:
- Windows Server Core v1909
- Windows Server 2019 v1803 (includes a GUI)
- Windows 10 v1909
- Nutanix VirtIO Drivers (this is providing necessary drivers for VMs)

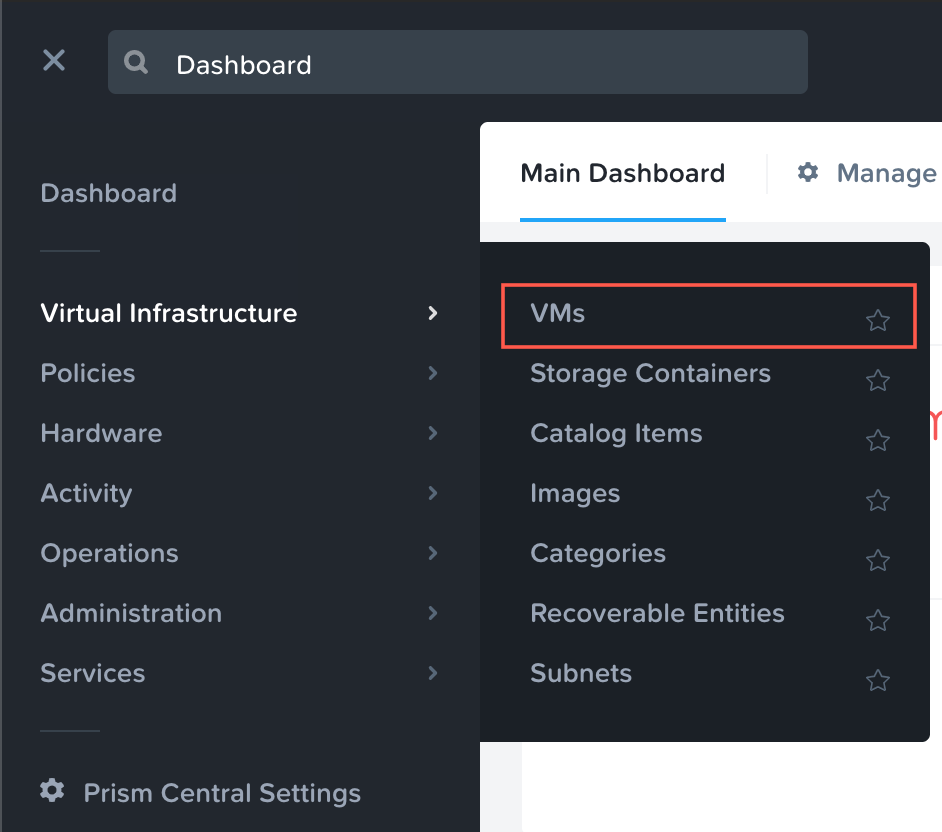
I will now create my template VMs so I can speed up deployment and later test some automation. For now I will use a vanilla install, apply all patches/updates to date in the template. But first I will create a new managed network on the cluster. I go to Virtual Infrastructure – VMs
I select Network Config to create a new LAB network.

My network is listed, but I want to create a new specific (isolated) network for my LAB environment, I click +Create Network

I provide all the details for my LAB network:
| Name | NLSOM-LAB |
| VLAN ID | 57 |
| Enable IP address management | Yes |
| Network IP address / Prefix length | 10.57.11.0/24 |
| Gateway IP address | 10.57.11.1 |
| Configure Domain Settings | Yes |
| Domain Name Servers | 10.57.11.10 |
| Domain Search | lab.damen-online.nl |
| Domain Name | lab.damen-online.nl |

I create a DHCP pool (by clicking on create pool), provide a start address (10.57.11.100) and end address (10.57.11.200) and click Save

After this a second network has been added to my available networks, and I can start creating my template VMs

I close the network configuration screen, and click on Create VM

Ok, providing information again:
| Name | Template_Windows_Server |
| Description | Template Windows Server version 1909 |
| Timezone | (UTC +01:00) Europe/Amsterdam |
| vCPU(s) | 2 |
| Number of cores per vCPU | 1 |
| Memory | 4 |

Then I need to Add New Disk and provide some information
| Type | Disk |
| Operatiom | Allocate on Storage Container |
| Bus Type | SCSI |
| Storage Container | SelfServiceContainer |
| Size (GiB) | 100 (Thinprovisioned by default) |
| Index | Next Available |

After clicking Add, I return to the Create VM wizard and add a CD-ROM so I can install an OS

I select Clone from Image Service as operation, then of course the correct image that I want to use to install on the VM and click Update

Again clicking the +Add New Disk option as I need to add the ISO with the VirtIO drivers. I will need the drivers during the setup of Windows, so there is no way to get around this

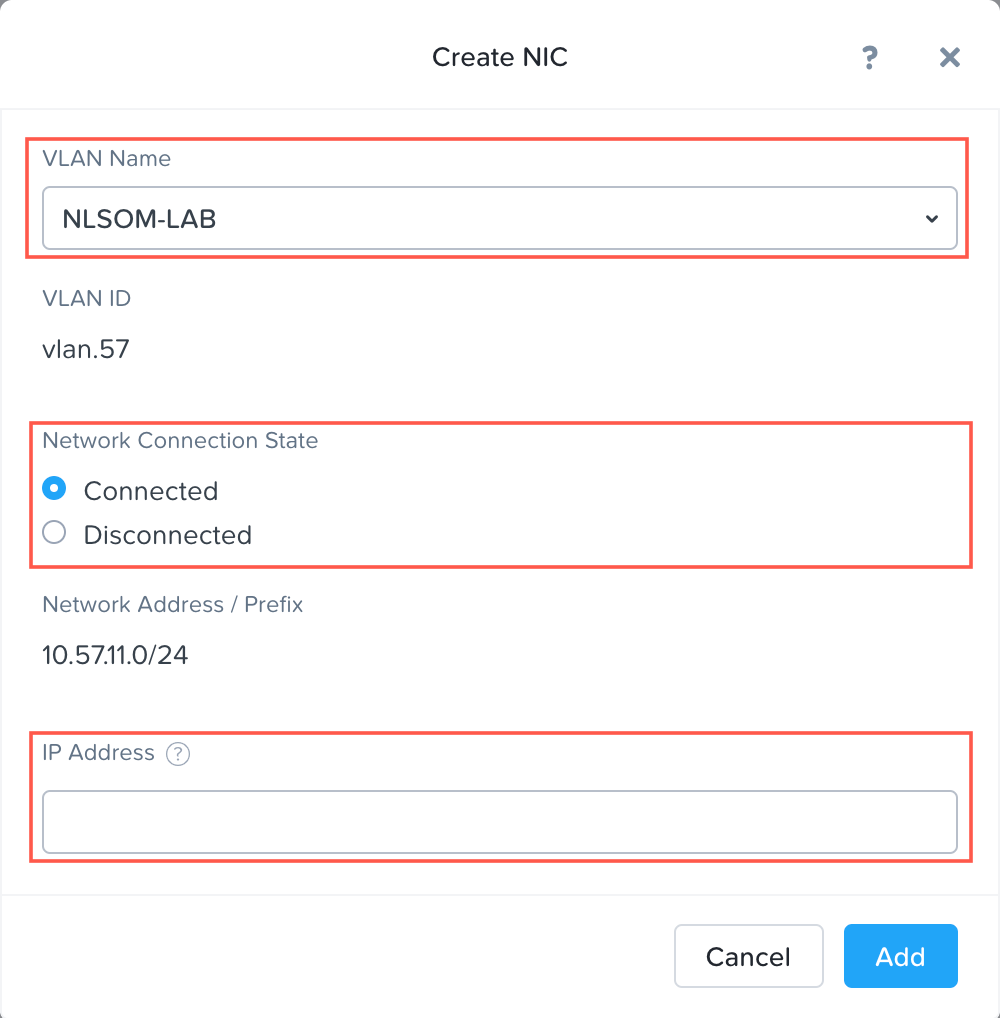
I use the UEFI firmware instead of legacy BIOS (as I’m using the latest OS versions) and click on + Add New NIC to connect to a network

I choose NLSOM-LAB as the VLAN and ensure the NIC is connected when starting. I don’t need to provide an IP address as I the network selected is a managed network and provides an IP address using DHCP. Now I click Add

Now I can click Save to create the VM.
After the VM has been created, I power on the VM.

After the VM has been powered on I can connect to the VM using Launch Console

The next section will not be exciting or giving you a lot of new information as I think almost everyone (with some IT affinity) will know how to install Windows. Reason why I still documented this, is because I want to ensure I can find the necessary steps in the future (so I can reproduce)
The installation will start (first time I was too slow to hit any button during boot) and the installation files will be loaded

The installation starts, I select the language (English), Time and currency format (Dutch (Netherlands)), Keyboard or input method (United States-International) and click Next

I click Install Now

I will select Windows Server Standard as my choice and click Next

I will accept the license terms (you need to, otherwise you cannot continue) and click Next

I click Custom: Install Windows only (advanced) as this is a fresh install.

Ok, now I normally see my disk where I can install Windows, but as you can see, this is empty… This is because I didn’t load the VirtIO drivers yet, so I will click Load driver

To install the device driver, I will need to search for the driver, so I click Browse

I browse to the folder on the VirtIO driver CD and select the correct folder, containing the drivers for Windows Server 2019 and click OK

I will select all drivers, so I don’t run into the same issue (driver not found) when moving forward and click Next so the drivers will be loaded

Now you see the drive assigned to the VM, so I can install Windows. Click Next. (I don’t need a special partitioning scheme for my template hence why I took the easy route)

The installation will start.

After the installation is finished, I can logon to the Windows Server instance. First thing is set a password, so I click OK and provide a new password and afterwards I can logon to the VM

Now I will download the latest windows updates to ensure the baseline is ok. For this I start the Server Configuration Tool (sconfig) and select option 6) Download and Install Updates

I search for All Updates, so type A. The script will return the applicable updates and I want to install all of them (Again A). The script will start downloading the updates and install them. After this is done, a restart is required (it’s windows after all).

After the restart, I log back in to the system and check some basics (Date and Time, Telemetry Settings) to ensure these are ok using sconfig.

I wanted to install the Nutanix Guest Tools, but during a training given by Ruben Spruijt there was noted that if you create a template to be used for Xi Frame you shouldn’t install NGT as it will break the functionality, so I will refrain from doing this at this moment as I want to test drive Xi Frame (soonish).

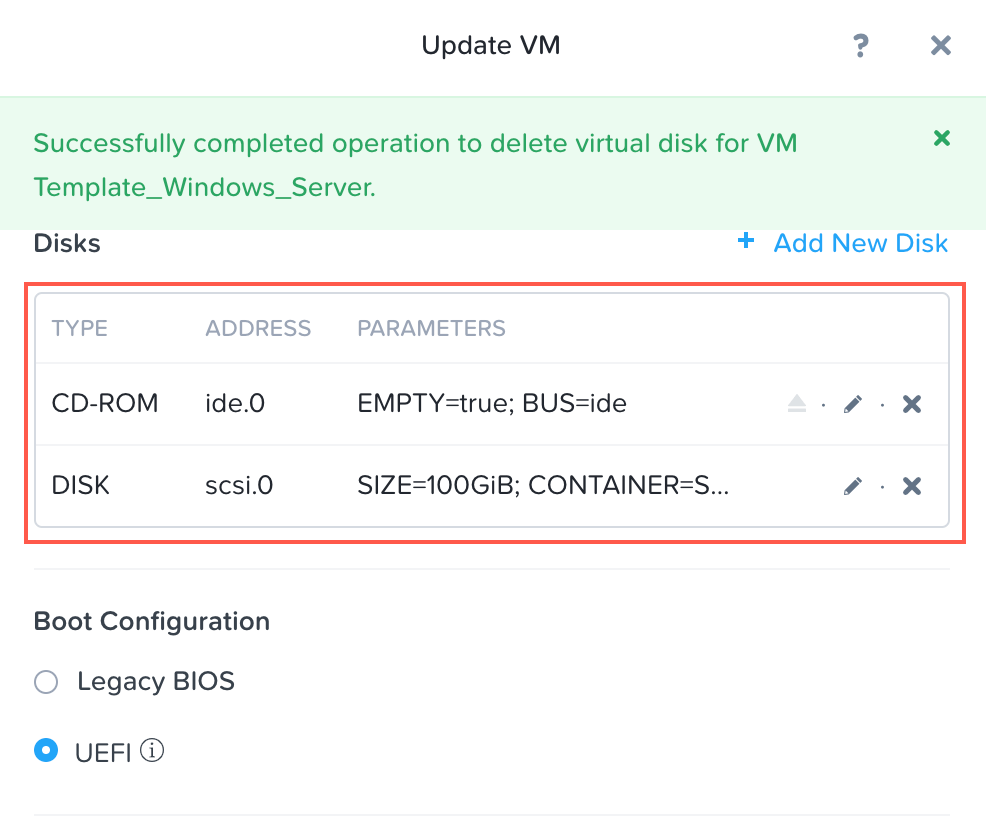
So I’ve ensured the correct drivers and the updates are installed (if you need more software to be installed do this now, I installed the new Microsoft Edge on my templates with a GUI), so I need to finish up. I shutdown the VM and remove the 2nd CD-ROM and empty the first one.
Ok after this Is done I start the VM for the last time to seal my template using sysprep.
C:\windows\system32\sysprep.exe /generalize /shutdown /oobe

Now the image has been sealed, I need to convert the VM to an image. For this I need to login to the CVM (Prism Element) using SSH. After I logon I need to get the VM_Disk of the machine I just sealed.
acli vm.get Windows_Server_Template include_vmdisk_paths=1 | grep -E 'disk_list|vmdisk_nfs_path|vmdisk_size|vmdisk_uuid'

Now we can create an image disk from this VM
acli image.create windows-server-template source_url="nfs://127.0.0.1/SelfServiceContainer/.acropolis/vmdisk/3d43f820-161b-4689-aa47-69965ee31ba1" container=SelfServiceContainer image_type=kDiskImage

As you can see above the creation of the template has been completed, so now I will check if this has been done.
acli image.get windows-server-template

Cool. A new disk image has been created from my VM. Now importing this image in Prism Central via the GUI (Virtual Infrastructure – Images)

I click on Import Images

The import wizard starts. I choose the easy way (All images) and click Save

After the import task is finished I see my image listed in my available images.

I will repeat above steps for the 3 Operating Systems I mainly use so I can save some time in the future deploying new VMs (and hopefully use these in my first steps for automation).