


This post will describe 2 use cases where I used my PKI, as those were most important to me. All my other infrastructure will get the proper certificate (where needed), but I will not describe this (or if I run into some issues)
Domain Controller
Ok now I made my Public Key Infrastructure available and want to ensure my Domain Controller is trusted by my clients. To do this I need to enable the Key Distribution Center (KDC) to prove its identity, which is done by installing a Kerberos Authentication certificate. To ensure the certificate template used by the Domain Controller includes the KDC authentication object identifier (OID), I need to create a new certification template. I will create a new template based on the current available Kerberos Authentication certificate template.
On my management server I start certsrv.msc (Certification Authority) and target this to my Enterprise Issuing CA (NLSOMCA02), right click Certificate Templates and click Manage

I right-click the Kerberos Authentication template and select Duplicate Template

This is my LAB and I will only work with supported versions of Operating Systems currently available (I see legacy enough during my daily job), so I ensure the compatibility settings for both options are defined for the latest level (if you want to play around with older versions I advise you to leave this alone)

I switch to the General tab and change the template display name to The Lab Kerberos Authentication. I will leave the validity & renewal period set to default.

I go to the Subject Name tab, select Build from this Active Directory information, do not provide a Subject name format and include the DNS name information.

Now I go to the Cryptography Tab and set the provider category to Key Storage Provider, the algorithm name to RSA, the Minimum key size to 2048 and the request hash to SHA256 and save the template by clicking OK.

New template created, check. Now to ensure this template will be used and replace all previous templates on my Domain Controller(s), I right click the -just created- template and select Properties.

I switch to the Superseded Templates tab and click Add
I select and add the following templates to be superseded by this template and click OK.
- Domain Controller
- Domain Controller Authentication
- Kerbers Authentication
To ensure the “old” templates cannot be used anymore I will unpublished these templates from my issuing CA. In the Certification Authority Console I go to certificate templates, select the templates that are superseded (see above), right-click and select delete.

I acknowledge that I want to disable the template

Now I can issue my new template by right-clicking Certificate Templates and select New | Certificate Template to issue

I select my newly created template and click OK

And my template is available:

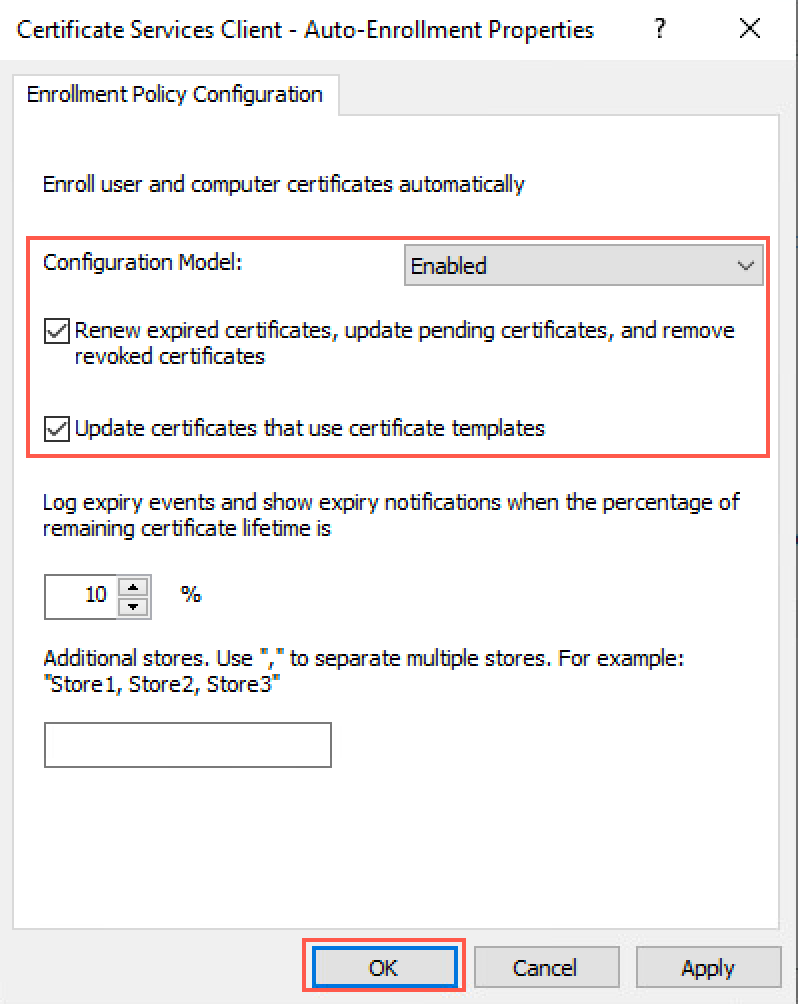
Last thing to do for this certificate is to ensure that this certificate is automatically enrolled to my Domain Controllers. For this I open the Group Policy Management Console and select the (already available) Default Domain Controller Policy. I right-click this policy and select Edit…

In the policy I go to Computer Configuration | Windows Settings | Security Settings | Public Key Policies and double-click Certificate Services Client – Auto-Enrollment

I enable the Auto-enrolment (Configuration Model = Enabled) and tick both boxes, after which I save the settings by clicking OK
- Renew expired certificates, update pending certificates, and remove revoked certificates
- Update certificates that use certificate templates
To check if my new certificate has been enrolled I check this via the certificate manager console and connect to my Domain Controller, where I can see that my certificate is enrolled.

Nutanix
I also create a new template for the webserver (to replace the self-signed certificate on my Nutanix CVMs). To do this I go back to the Certification Authority and create a duplicate of the webserver template

I set the compatibility settings to the latest level (same as I did for the Domain Controller certificate) and go to the General tab.

Here I provide the name for this certificate template (The LAB Web Server) and leave the default periods as-is.
Next up the Request Handling tab where I tick the box for Allow private key to be exported.

Going to the Subject Name, to ensure this is set to Supply in the request

Up to the Cryptography tab, where I set the provider category to Key Storage Provider, the algorithm name to RSA, the Minimum key size to 2048 and the request hash to SHA256 and click OK.

Now I can also issue this template by right-clicking Certificate Templates and select New | Certificate Template to issue
I select my template and click OK

And this template is also available:

Now I create a Certificate Signing Request (CSR) on my CVM. One thing I found out is that Google Chrome & Firefox will report an error (“Subject Alternative Name Missing” or NET::ERR_CERT_COMMON_NAME_INVALID or “Your connection is not private”) if the SAN Name is missing, so I ensure this was included in my request. To start the request I first created a configuration file containing the information for the certificate and I uploaded this file to my CVM.

After this is done, I connect to the CVM and run the following command:
openssl req -out NLSOMVC01.csr -newkey rsa:2048 -nodes -sha256 -keyout NLSOMVC01.key -config nlsomvc01.cnf

I will download the generated files to my machine, so I can upload these to my PKI.

After these are downloaded I will open a browser and go to http://pki.lab.damen-online.nl/CertSrv, and click on Request a certificate

In the next window, I select advanced certificate request

I open my csr file in Notepad and copy the contents into my request field and select Web Server as the Certificate Template and click Submit

After clicking Next, I can download my generated certificate. I choose Base 64 encoded and click Download certificate

After the certificate is downloaded, I go back to the homepage of my PKI web server and select to Download a CA Certificate, certificate chain or CRL

In the next window, I select Base 64 as Encoding Method and click on Download CA Certificate Chain.

The Certificate chain will be downloaded in a PKCS #7 format (Cryptograhic Message Syntax Standard), which I can’t use to upload to my CVM or Prism Central, as this will only accept a certificate chain in a PEM format (Privacy Enhanced Email), so I need to convert this. To do this I will use OpenSSL on my machine and run the following command:
openssl.exe pkcs7 -in certnew.p7b -inform DER -print_certs -out certchain.pem

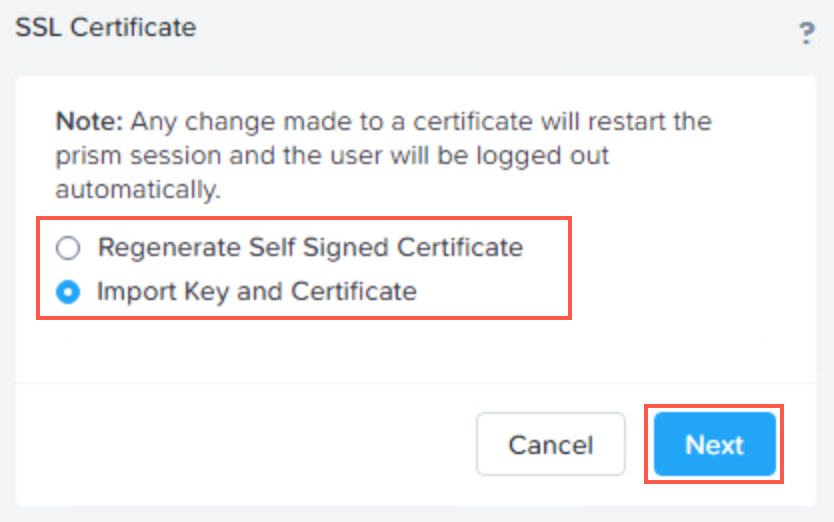
After I have all the files I can replace the certificate on Prism Element (NLSOMVC01) & Central (NLSOMPC01). I open the console and go to Settings – SSL Certificate – Replace SSL Certificate

A wizard starts. I select Import Key and Certificate and click Next
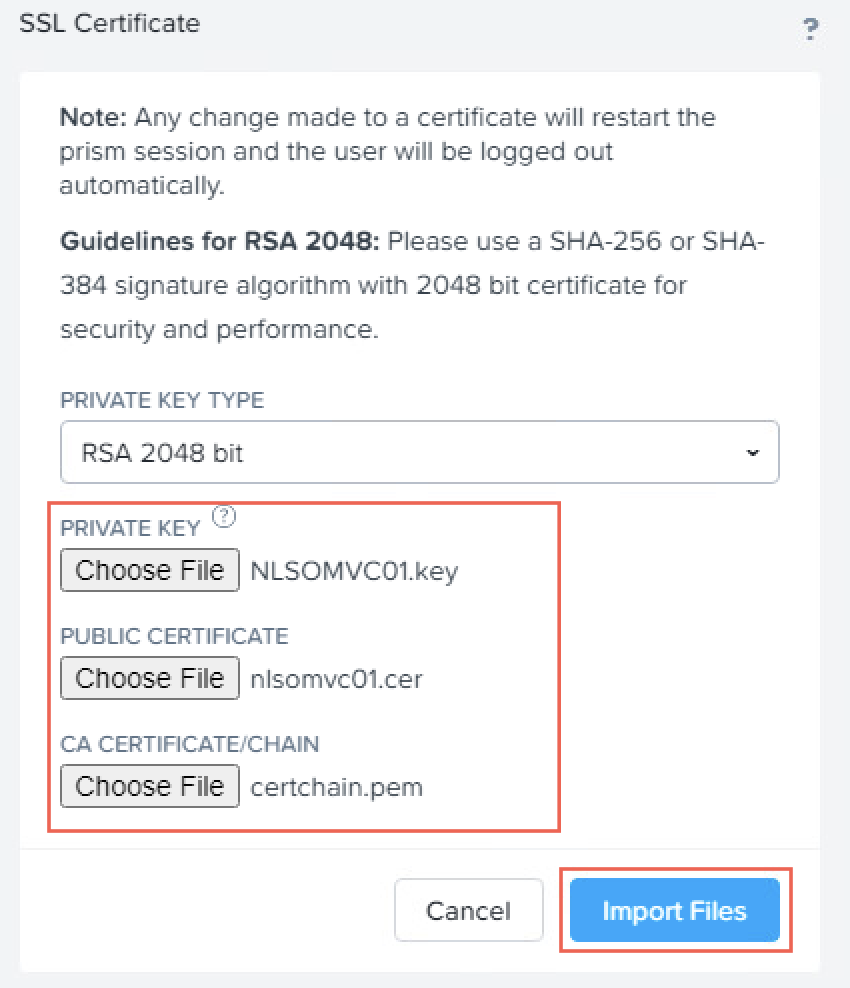
In the next screen I add the private key, the generated certificate and the intermediate certificate and click Import Files
The (web) server will restart to apply the new certificate and I can see my certificate is valid and my connection is secured.

Checking my SSL Certificate in the UI will show the information that I provided:

I will repeat the same for PrismCentral, so my Nutanix consoles are secured.
